Have you often encountered sudden lag on your Windows PC, received “low memory” warnings when opening multiple tasks, or watched the progress bar stall endlessly when running large software like Photoshop or Premiere Pro? Many times, this isn’t because your physical memory (RAM) is completely insufficient, but because your virtual memory configuration hasn’t kept up with your actual needs. This article will start from technical principles, combine the latest features of Windows systems in 2025, and teach you how to scientifically set up virtual memory to avoid resource waste while maximizing system performance.

1. What is Virtual Memory? Why is it Important for Windows?
Before diving into setup methods, we need to understand: what role does virtual memory actually play? Simply put, it’s “temporary memory” simulated by the Windows system using hard drive space. When physical memory (RAM) is occupied to a certain extent, the system automatically transfers infrequently used data to virtual memory, thereby freeing up RAM resources for active applications.
Here’s a key insight: virtual memory is not a “replacement” for RAM, but a “supplement”. Because the read-write speed of hard drives (even SSDs) is much slower than RAM (usually more than 10 times slower), over-reliance on virtual memory will instead slow down the system. However, without it, when RAM is exhausted, applications will crash directly or the system will freeze.
Core Difference Comparison Between RAM and Virtual Memory (Hard Drive)
| Feature | Physical Memory (RAM) | Virtual Memory (HDD/SSD) |
|---|---|---|
| Read-Write Speed | Extremely fast (DDR4 ~20GB/s, DDR5 up to 50GB/s+) | Slower (SATA SSD ~500MB/s, NVMe SSD ~3-7GB/s) |
| Storage Capacity | Smaller (common sizes: 8GB, 16GB, 32GB) | Larger (depends on remaining hard drive space) |
| Data Persistence | Lost when power is off (temporary storage) | Retained when power is off (stores page file long-term) |
| Core Function | Runs currently active applications/processes | Temporarily stores inactive data to free up RAM |
2. When Do You Need to Manually Set Virtual Memory? Isn’t Default Automatic Management Sufficient?
Windows systems by default “automatically manage paging file size for all drives”, dynamically adjusting virtual memory based on RAM capacity and usage. However, in the following 4 scenarios, manually setting virtual memory can significantly improve the experience:
- Scenario 1: Small physical memory (≤4GB): Default settings may frequently trigger “low memory” warnings due to insufficient virtual memory, leading to browser crashes and unsaved document loss.
- Scenario 2: Running professional software/games: Some design software (such as AutoCAD, 3ds Max) and large games (such as *Cyberpunk 2077*) clearly require a minimum virtual memory size. Failure to meet this requirement may result in failure to launch or frequent crashes.
- Scenario 3: System lags frequently but RAM is not full: This may be due to unreasonable default virtual memory allocation, causing the system to frequently “swap data” between RAM and hard drive (known as “page thrashing”).
- Scenario 4: System drive space is tight: By default, virtual memory is stored on the C drive. If the remaining space on the C drive is less than 10GB, virtual memory may not be able to expand, leading to performance issues.
3. What’s the Right Size for Windows Virtual Memory? 2025 Latest Recommended Plan
There’s no “one-size-fits-all” standard for virtual memory size, but it can be accurately matched based on physical memory capacity and usage scenarios. Below is a tested and verified recommended plan (unit: GB, 1GB=1024MB):
Virtual Memory Setting Recommendations for Different RAM Capacities
| Physical Memory (RAM) | Is Disabling Virtual Memory Recommended? | Recommended Initial Size | Recommended Maximum Size | Applicable Scenarios |
|---|---|---|---|---|
| ≤4GB | ❌ Definitely not recommended | RAM×1.5 (e.g., 4GB→6GB) | RAM×3 (e.g., 4GB→12GB) | Daily office work (Word/Excel), light web browsing |
| 8GB | ❌ Not recommended | RAM×1 (e.g., 8GB→8GB) | RAM×2 (e.g., 8GB→16GB) | Moderate multitasking, light design (basic Photoshop editing), mainstream online games |
| 16GB | ✅ Optional to disable | RAM×0.5 (e.g., 16GB→8GB) | RAM×1.5 (e.g., 16GB→24GB) | Heavy multitasking, professional design, 3A games (1080P) |
| ≥32GB | ✅ Recommended to disable (unless special needs) | 2GB (minimum guarantee) | 8GB (maximum limit) | Workstation-level tasks (video rendering, multiple VMs running) |
Important Reminder: 1. It’s recommended to set the “Initial Size” and “Maximum Size” of virtual memory to the same value to avoid hard drive fragmentation caused by frequent system adjustments to the page file size; 2. The maximum size should not exceed 1/8 of the remaining space of the hard drive partition to prevent occupying too much storage resources.
Which Drive to Set Virtual Memory On? Tips for Maximizing Performance
Choosing the right partition has a greater impact on performance than worrying about the size! The correct priority order is:
- First choice: NVMe SSD partition with sufficient free space: The high-speed read-write of NVMe SSD can minimize the performance loss of virtual memory, and do not choose the system drive (C drive) to avoid seizing system I/O resources.
- Second choice: SATA SSD partition: Performance is slightly inferior to NVMe but still much better than mechanical hard drives.
- Not recommended: Mechanical hard drive (HDD): Read-write speed is too slow, overuse will cause severe system lag.
4. 3 Methods to Set Windows Virtual Memory: GUI + Command Line + PowerShell
Below are virtual memory setup methods for different user habits, covering GUI (suitable for ordinary users) and command line (suitable for IT administrators/advanced users). The operation steps have been verified on Windows 10/11 systems.
Method 1: Set via “System Properties” GUI (Most Common)
Suitable for most users with intuitive steps and no code required:
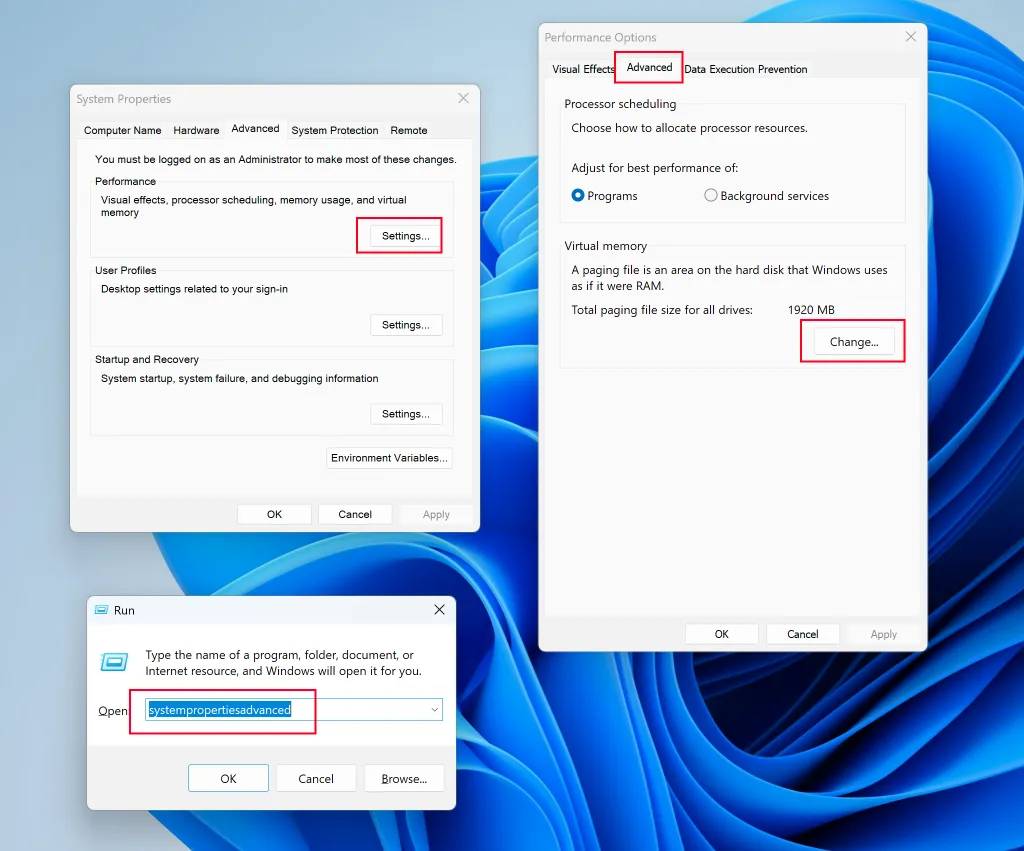
- Press Win + R to open the “Run” dialog box, type systempropertiesadvanced and press Enter to open the “System Properties” window.
- In “System Properties”, switch to the “Advanced” tab, and click the [Settings] button in the “Performance” area.
- In the “Performance Options” window, continue to switch to the “Advanced” tab, and click the [Change] button in the “Virtual Memory” area.
- Uncheck “Automatically manage paging file size for all drives”, then select the partition where you want to set virtual memory (e.g., Drive D, preferably an SSD partition) from the list below.
- Select “Custom size”, enter the “Initial size” and “Maximum size” (refer to the table above, unit: MB), click [Set] → [OK].

- Restart the computer for the settings to take effect.
(Screenshot placeholder: System Properties – Performance Settings – Virtual Memory Change Interface)
Method 2: Manage via WMIC Command Line (Suitable for Batch Operations)
Suitable for IT administrators or scenarios where multiple computers need to be configured quickly. Run Command Prompt as administrator:
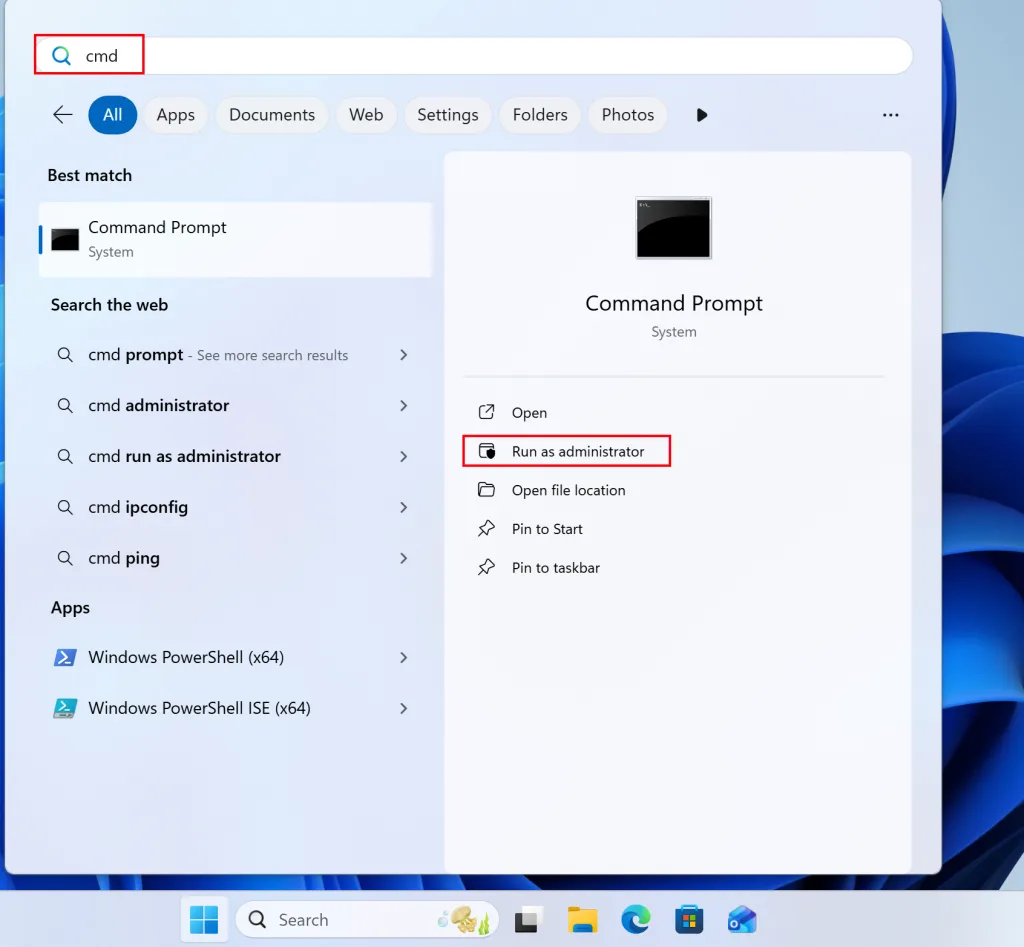
- Right-click the “Start” menu, select [Terminal (Admin)], press Ctrl + Shift + 2 to switch to the Command Prompt interface.
- Execute the following commands according to needs (copy and paste directly, note to modify the drive letter and values):
- Enable automatic virtual memory management:
wmic computersystem where name="%computername%" set AutomaticManagedPagefile=True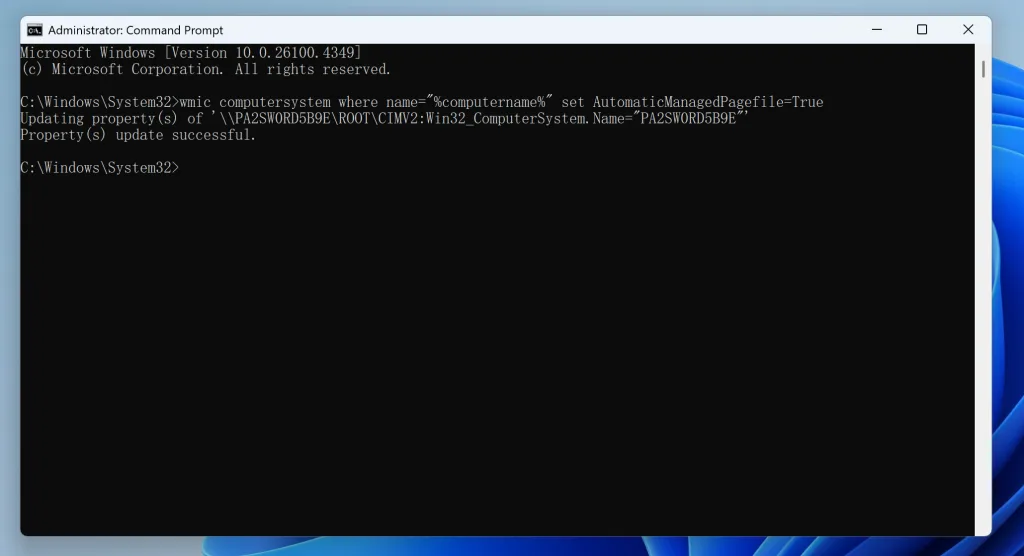
- Disable automatic management (prepare for customization):
wmic computersystem where name="%computername%" set AutomaticManagedPagefile=False- View current virtual memory settings:
wmic pagefile list /format:list
- Set virtual memory for a specific drive (e.g., Drive C) (Example: Initial 4GB, Maximum 8GB):
wmic pagefileset where name="C:\\pagefile.sys" set InitialSize=4096,MaximumSize=8192If you encounter “wmic not found” error, you need to enable WMIC using the following command:
DISM /Online /Add-Capability /CapabilityName:WMIC~~~~Restart the computer after execution for the settings to take effect.
Method 3: Set via PowerShell Script (Preferred for Advanced Users)
PowerShell is more flexible than Command Prompt, supporting batch configuration and scripting:
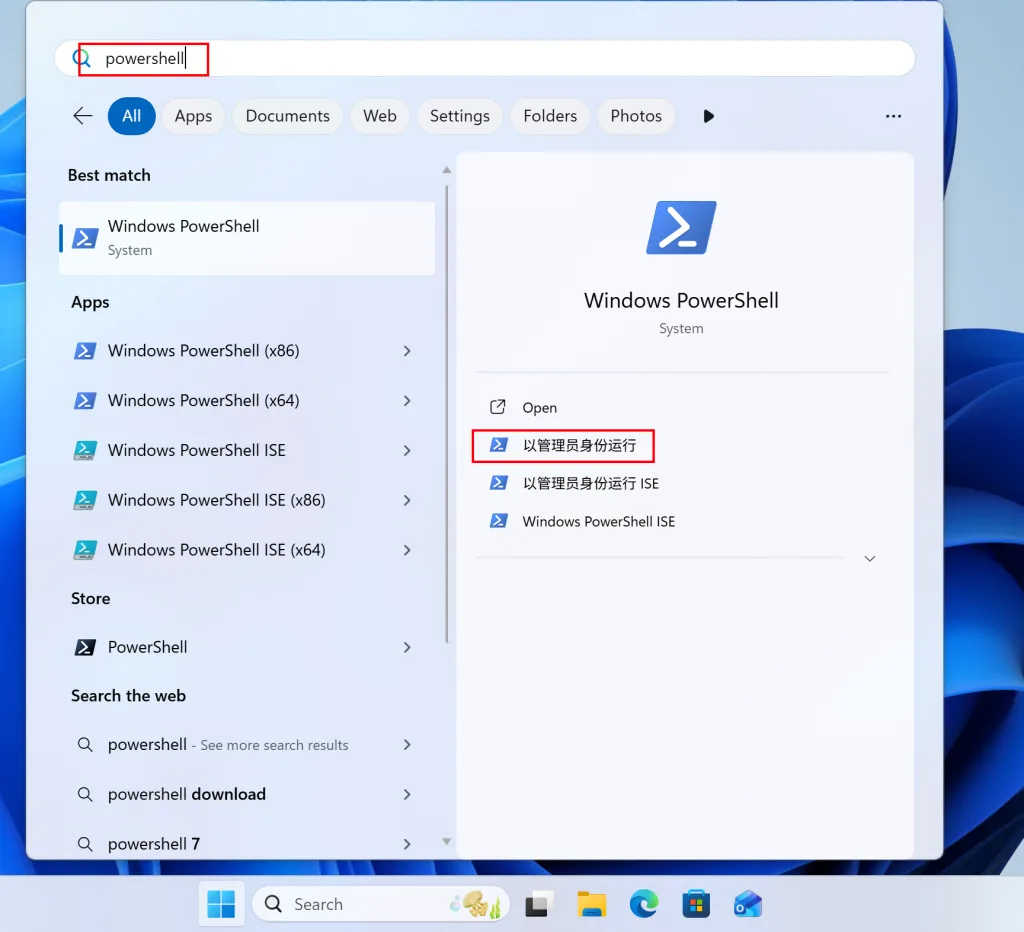
- Open Windows Terminal as administrator, press Ctrl + Shift + 1 to switch to the PowerShell interface.
- Execute the following commands to complete corresponding operations:
- View detailed current virtual memory settings:
Get-CimInstance -ClassName Win32_PageFileUsage | Select-Object Name,InitialSize,MaximumSize,CurrentUsage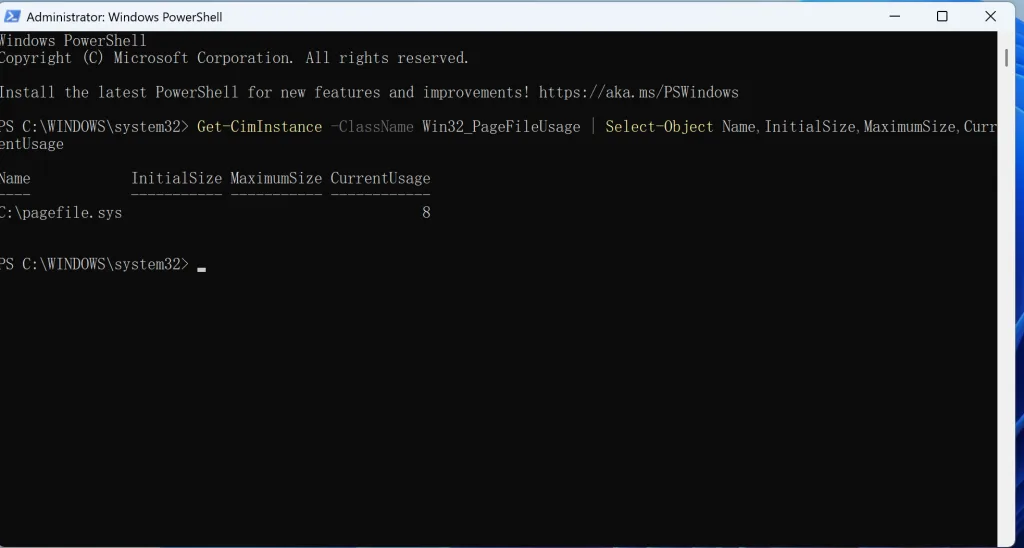
- Customize virtual memory (Example: Drive E, Initial 2GB, Maximum 6GB):
# Define parameters $pageFilePath = "E:\\pagefile.sys" $initialSize = 2048 # Initial size (MB) $maximumSize = 6144 # Maximum size (MB) # Apply settings Set-CimInstance -Query "SELECT * FROM Win32_PageFileSetting WHERE Name ='$pageFilePath'" -Property @{InitialSize = $initialSize MaximumSize = $maximumSize }- Restore automatic management:
$pageFilePath = "E:\\pagefile.sys" Set-CimInstance -Query "SELECT * FROM Win32_PageFileSetting WHERE Name ='$pageFilePath'" -Property @{InitialSize = 0 MaximumSize = 0 }5. Common Issues: No Effect After Setting Virtual Memory? Avoid These Pitfalls
Many users report that performance doesn’t improve after settings, or even becomes slower. Most likely, they’ve fallen into the following 3 pitfalls:
Pitfall 1: Virtual Memory Set on Mechanical Hard Drive
The read-write speed of mechanical hard drives is much lower than RAM. Even if a large virtual memory size is set, lag will occur due to “too slow data exchange”. Solution: Migrate to an SSD partition.
Pitfall 2: Large Gap Between Initial Size and Maximum Size
If the initial size is 1GB and the maximum size is 20GB, the system will frequently “expand” virtual memory, causing a lot of hard drive fragmentation and slowing down the speed. Solution: Set both to the same value.
Pitfall 3: Severely Insufficient Physical Memory but Relying Only on Virtual Memory
If your computer only has 4GB RAM but you want to run Chrome (10 tabs) + Photoshop + WeChat at the same time, even if virtual memory is set to 12GB, lag will occur due to frequent paging. Ultimate Solution: Upgrade physical memory (RAM), which is the most fundamental way to improve multitasking performance.
Conclusion: The “Golden Rules” for Virtual Memory Settings
Virtual memory is a “memory buffer” for Windows systems, but not a “panacea”. Remember the following 3 points to achieve scientific configuration:
- Prioritize physical memory: 8GB is the entry threshold, 16GB is the current mainstream, and 32GB or more is suitable for professional scenarios;
- Virtual memory “just enough is best”: Match the size according to RAM capacity, don’t blindly pursue “the larger the better”;
- Choose the right partition for storage location: Prefer free NVMe SSD partitions, stay away from system drives and mechanical hard drives.
After setting up according to the methods in this article, you will find that the multitasking capability and stability of your computer have significantly improved. If you encounter specific problems, feel free to leave a comment below and I will answer them one by one.

nice