As a Windows user, have you ever encountered scenarios like your computer automatically sleeping and causing unsaved documents while working outside, or wanting longer laptop standby time but not knowing how to adjust it? In fact, Windows 11’s sleep mode is designed to balance energy efficiency and convenience, but only by mastering the correct setup methods can it adapt to your usage scenarios—whether you’re a mobile professional needing long battery life or a heavy user pursuing high performance.
This article will start with the underlying logic of sleep mode, combine the latest system features, and provide a step-by-step guide to adjusting settings and troubleshooting issues. It also integrates 10 years of Windows system optimization experience to help you avoid common pitfalls and keep your device in top condition.
I. First, Understand: The Core Differences Between Windows 11’s Two Sleep Modes
Many users don’t know that Windows 11 actually has two hidden sleep modes—Traditional Sleep (S3) and Modern Standby (S0). Their power consumption, wake-up speed, and applicable scenarios are completely different. Choosing the wrong mode not only affects battery life but may also cause device lag or network disconnection.
1.1 Traditional Sleep Mode (S3 State): The “Basic Version” for Older Devices
Traditional sleep mode is an early power management solution for Windows, currently only common on older laptops or desktops released before 2019. Its core features are “deep hibernation, low power consumption but slow wake-up”:
- Hardware such as the CPU, hard drive, and network card will completely power off, with only the memory receiving power to maintain the current working state (e.g., open documents, web pages).
- Power consumption is extremely low (usually 2%-5% per hour for laptops), but waking up to the working state takes 10-30 seconds, and you need to reconnect to the network after waking up.
- Suitable for scenarios where you won’t use the device for a long time but don’t want to shut it down, such as closing the laptop after work in the evening and using it again the next morning.
1.2 Modern Standby (S0 State): The “High-Efficiency Version” for Modern Devices
Modern Standby is the default mode for Windows 11, and most mainstream brand models released after 2020 (such as ASUS, Dell, HP) now support it. It’s equivalent to a “low-power active state” that balances battery life and convenience:
- Unused hardware (such as discrete graphics cards, USB ports) will power off, but the CPU runs at a low frequency and the memory continues to receive power.
- Wake-up speed is extremely fast (usually within 3 seconds), and it maintains network connectivity, allowing you to receive WeChat messages and download Windows updates in the background.
- When connected to power, it automatically enters “Maintenance Mode” to complete tasks like virus scanning and file backups in the background without affecting foreground use.
- Suitable for scenarios where you switch usage states frequently, such as closing the laptop during meeting breaks and opening it again a few minutes later to resume work immediately.
1.3 Find Out Which Mode Your Computer Supports in 30 Seconds
Want to know which sleep mode your device uses? No need to install software—you can check it with a system command:
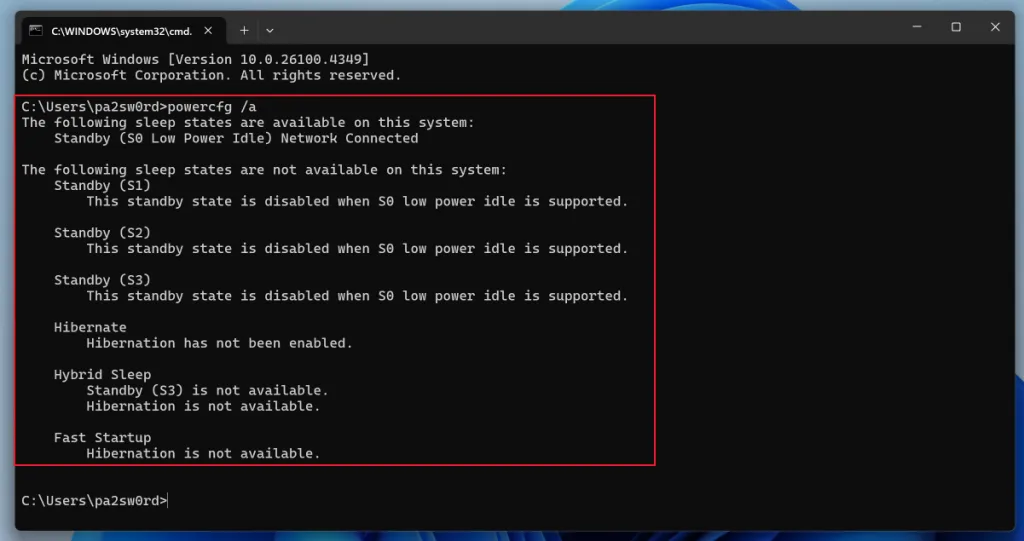
- Right-click the “Start” button on the taskbar and select “Terminal (Admin)” (must be opened as an administrator, otherwise an error will occur).
- Type powercfg /a in the command line and press Enter to execute.
- Check the results: If it shows “Modern Standby is supported”, it’s S0 mode; if only “S3 Sleep is supported” is displayed, it’s traditional mode.

II. Practical Operation: 3 Ways to Manually/Auto Control Sleep Mode
Mastering sleep trigger methods for different scenarios allows you to manage your device more flexibly. Below are tested and efficient methods covering all needs from quick hibernation to permanent disablement.
2.1 Manually Enter Sleep: Quick Operations in 3 Seconds
These two methods are most commonly used when leaving the computer temporarily:
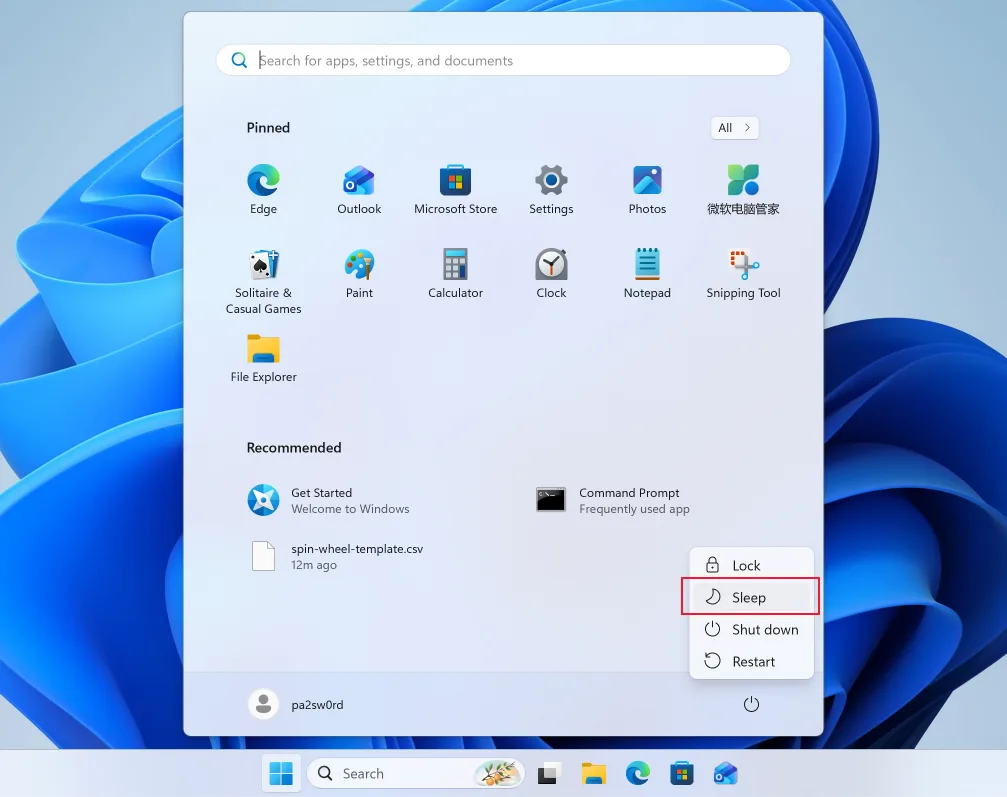
- Start Menu Method: Click “Start” on the taskbar → Click the “Power” icon → Select “Sleep”. Suitable for desktops or laptops with external keyboards.
- Shortcut Key Method: Press Win + L to lock the screen, then click “Power” → “Sleep” in the bottom right corner of the screen. One step fewer than the first method.

2.2 Auto Sleep Settings: Precise Control Based on Power Status
Windows 11 allows you to set sleep rules separately for “On Battery” and “Plugged In”, which is crucial for laptop users—after all, you pursue performance when plugged in and need to save power when on battery.
Method 1: Via System Settings (Most Intuitive)
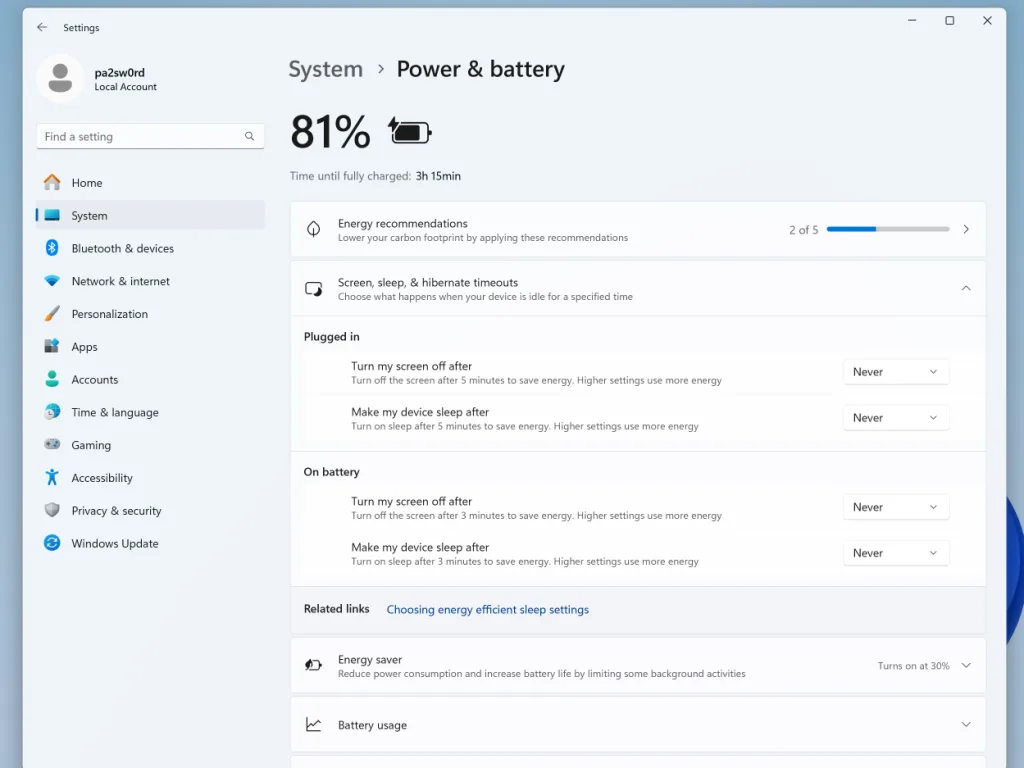
- Press Win + I to open “Settings”, click “System” on the left → “Power & battery” on the right.
- On the “Power & battery” page, expand the “Screen, sleep, and hibernation timeout” option.
- Set two parameters separately for “Plugged in” and “On battery”:
- “Turn off my screen after”: It’s recommended to set it 5-10 minutes shorter than the sleep time (e.g., turn off the screen after 10 minutes, enter sleep after 15 minutes) to avoid screen power consumption.
- “Put my device to sleep after”: For mobile work, set it to “15 minutes”; for plugged-in work, set it to “Never” (to prevent automatic sleep while compiling code).

Method 2: Via Control Panel (For Advanced Users)
If you need more precise power plan adjustments (such as modifying hibernation time or processor performance), you can use the Control Panel:
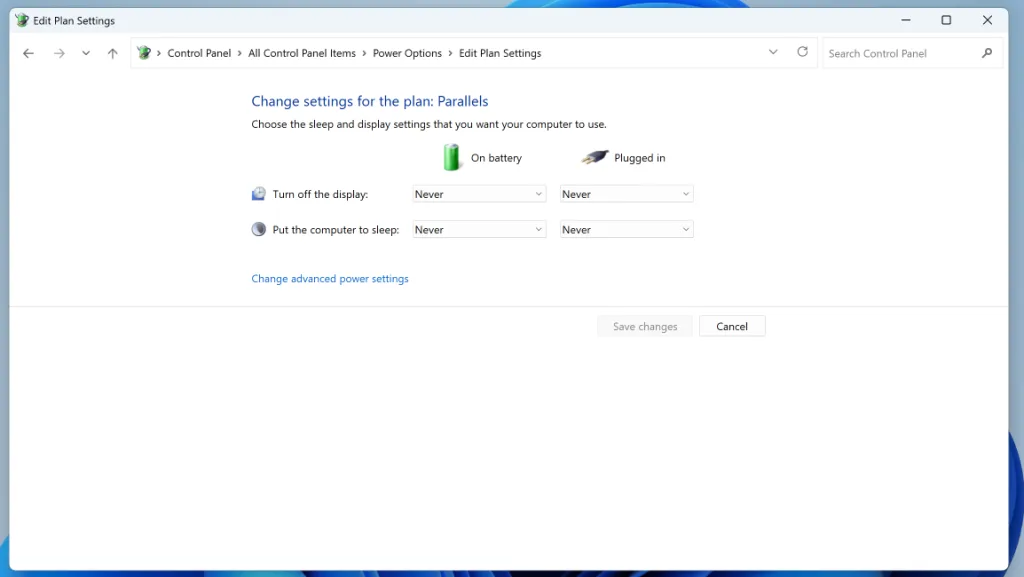
- Press Win + R to open “Run”, type powercfg.cpl and press Enter to open “Power Options”.
- Click “Change plan settings” next to the currently used power plan (e.g., “Balanced”).
- Set “Put the computer to sleep” time for “On battery” and “Plugged in” respectively, then click “Save changes”.

2.3 Special Needs: Disable Auto Sleep or Set Lid Close Rules
Some scenarios require completely disabling auto sleep (such as using a laptop connected to a projector for presentations) or setting lid close behavior (such as not sleeping and continuing to download files after closing the lid):
- Go to “Settings” → “System” → “Power & battery”, expand “Lid, power, and sleep button settings”.
- Set three options as needed:
- “When I press the power button”: It’s recommended to set it to “Sleep” (quickly hibernate by pressing the power button in an emergency).
- “When I close the lid”: Set to “Do nothing” when downloading with power plugged in, and “Sleep” when using on battery.
- “When I press the sleep button”: Keep the default setting of “Sleep”.
💡 Note: After disabling auto sleep, remember to manually turn off the screen or hibernate to avoid prolonged screen power consumption—especially when on battery, the screen can account for more than 40% of power usage.
III. Advanced: Wake-Up Tips and Common Issues
Waking up a sleeping Windows 11 is simple, but there may be differences between devices. At the same time, some wake-up issues can be resolved through settings.
3.1 4 Common Ways to Wake Up the Device
- Laptop: Press the power button, open the screen lid, or click any key on the touchpad/keyboard.
- Desktop: Press the host power button, or shake the mouse/type on the keyboard.
- External Devices: Wake up via Bluetooth keyboard/mouse (you need to enable “Allow this device to wake the computer” in Device Manager).
3.2 Common Issue: What to Do If the Network Disconnects After Waking Up from Sleep?
This is a common problem with Traditional Sleep Mode (S3). Here’s how to fix it:
- Right-click “This PC” → “Manage” → “Device Manager”.
- Expand “Network adapters” and find your network card (e.g., “Intel(R) Wi-Fi 6 AX201”).
- Right-click the network card → “Properties” → “Power Management”, uncheck “Allow the computer to turn off this device to save power”, and click “OK”.
For Modern Standby Mode (S0), network disconnection usually doesn’t occur. If it does, it’s recommended to update the network card driver (download the driver for the corresponding model from the brand’s official website, which is more stable than Windows automatic updates).
IV. Summary: Choose the Best Sleep Strategy Based on Scenarios
Finally, here’s a table to help you quickly match usage scenarios with sleep settings—you can apply them directly:
| Usage Scenario | Recommended Sleep Mode | Key Settings |
|---|---|---|
| Mobile Work (On Battery) | Modern Standby (S0) | Turn off screen after 10 minutes, enter sleep after 15 minutes; set lid close to “Sleep” |
| Plugged-In Work (High-Intensity Tasks) | Modern Standby (S0) | Turn off screen after 30 minutes, set sleep to “Never” |
| Long-Term Inactivity (e.g., Overnight) | Traditional Sleep (S3)/Hibernation | Manually enter sleep, or set sleep after 60 minutes |
| Presentations/Downloads (Needs Continuous Operation) | Disable Auto Sleep | Set sleep to “Never”, set lid close to “Do nothing” |
Windows 11’s sleep mode may seem simple, but it hides many optimization details. After mastering these methods, you can not only avoid work interruptions caused by unexpected device sleep but also maximize battery life—after all, for laptop users, “having power” is the prerequisite for productivity. If you encounter special issues during setup (such as not finding certain options), feel free to leave a comment, and I’ll provide specific solutions based on your device model.
